Chap.2 CSS3[CSS3 선택자] - 선택자 개요, 기본 선택자, 속성 선택자, 후손 선택자, 자손 선택자, 반응 선택자, 상태 선택자, 구조 선택자
CSS3 선택자
선택자 개요, 기본 선택자, 속성 선택자, 후손 선택자, 자손 선택자, 반응 선택자, 상태 선택자, 구조 선택자
선택자 개요
-
CSS3 선택자
- 특정한 HTML 태그를 선택할 때 사용하는 기능
- 선택한 태그에 원하는 스타일이나 스크립트 적용 가능

-
CSS 블록
- style 태그 내부에 입력
-
스타일시트
- style 태그 내부에 입력하는 코드
-
CSS3 선택자
기본 선택자
-
기본 선택자

-
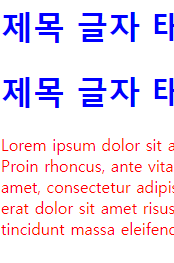
전체 선택자 적용하기 - default_wildcard.html
- 모든 태그의 color 스타일 속성을 red로 변경
<!DOCTYPE html>
<html>
<head>
    <title>CSS3 Selector Basic Page</title>
    <style>
        * {
            color: red;
        }
    </style>
</head>
<body>
    <h1>제목 글자 태그</h1>
    <p>Lorem ipsum dolor sit amet, consectetur adipiscing elit. Sed nisi
        risus, sollicitudin eget vehicula sed, eleifend suscipit neque. Proin
        rhoncus, ante vitae mattis consequat, libero nunc posuere justo, ut laoreet
        dolor nunc at dolor. Lorem ipsum dolor sit amet, consectetur adipiscing elit.
        Maecenas dictum, lectus vestibulum laoreet tincidunt, nisi augue blandit
        risus, ut vestibulum erat dolor sit amet risus. Praesent semper consectetur
        mi eget auctor. Nulla facilisi. Duis bibendum massa in dui interdum sed
        tincidunt massa eleifend.</p>
</body>
</html>
결과

-
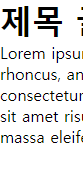
태그 선택자 적용하기 - default_tag.html
- h1 태그 , p 태그에 스타일 적용
<!DOCTYPE html>
<html>

<head>
    <title>CSS3 Selector Basic Page</title>
    <style>
        h1 {
            color: blue;
        }

        p {
            color: red;
        }
    </style>
</head>

<body>
    <h1>제목 글자 태그1</h1>
    <h1>제목 글자 태그2</h1>
    <p>Lorem ipsum dolor sit amet, consectetur adipiscing elit. Sed nisi
        risus, sollicitudin eget vehicula sed, eleifend suscipit neque. Proin
        rhoncus, ante vitae mattis consequat, libero nunc posuere justo, ut
        laoreet dolor nunc at dolor. Lorem ipsum dolor sit amet, consectetur
        adipiscing elit. Maecenas dictum, lectus vestibulum laoreet tincidunt,
        nisi augue blandit risus, ut vestibulum erat dolor sit amet risus.
        Praesent semper consectetur mi eget auctor. Nulla facilisi. Duis bibendum
        massa in dui interdum sed tincidunt massa eleifend.</p>
</body>

</html>
결과
-
한꺼번에 여러 개의 선택자를 입력하여 스타일 속성 적용
- reference_multi.html
<!DOCTYPE html>
<html>

<head>
    <title>CSS3 Selector Basic Page</title>
    <style>
        body, p, h1, h2, h3, h4, h5, h6 { margin: 0;padding: 0 }
    </style>
</head>

<body>
    <h1>제목 글자</h1>
    <p>Lorem ipsum dolor sit amet, consectetur adipiscing elit. Sed nisi
        risus, sollicitudin eget vehicula sed, eleifend suscipit neque. Proin
        rhoncus, ante vitae mattis consequat, libero nunc posuere justo, ut
        laoreet dolor nunc at dolor. Lorem ipsum dolor sit amet, consectetur
        adipiscing elit. Maecenas dictum, lectus vestibulum laoreet tincidunt,
        nisi augue blandit risus, ut vestibulum erat dolor sit amet risus.
        Praesent semper consectetur mi eget auctor. Nulla facilisi. Duis bibendum
        massa in dui interdum sed tincidunt massa eleifend.</p>
</body>

</html>
결과
-
공간 분할 태그에 아이디 선택자를 사용하여 id 속성을 적용
- default_id.html

<style>
    #header {  /*아이디 선택자*/
        width: 800px;
        margin: 0 auto;
        /* margin: 40px 80px; 상 우 하 좌 순 */
        /* 값을 2개 주면 (상,하), (좌,우) 순
        /* 하나의 값을 주면 모든 방향의 여백이 같음 */
        background: red;
    }

    #wrap {
        width: 800px;
        margin: 0 auto; /*좌우 여백 남는 부분으로 알아서*/
        overflow: hidden;
        background: salmon;
    }

    #aside {
        width: 200px;
        float: left; /* 블록을 때서 왼쪽으로 붙인다. */
        background: blue;
    }

    #content {
        width: 600px;
        float: left;
        background: green;
    }
</style>

<body>
    <div id="header">
        <h1>#header 태그</h1>
    </div>
    <div id="wrap">  <!-- aside와 content는 wrap의 자식 -->
        <div id="aside">
            <h1>#aside 태그</h1>
        </div>
        <div id="content">
            <h1>#content 태그</h1>
        </div>
    </div>
    테스트 <!-- wrap에서 overflow: hidden; 이 없으면 오른쪽에 공간이 있어서 오른쪽에 표시됨 -->
</body>
결과

WebPage > F12로 영역 확인
-
id 속성 중복
- id 속성이 중복되면 해당 id 속성을 표시한 모든 태그에 스타일이 적용됨.
- 스타일시트에서는 문제가 없지만 자바스크립트에서는 id 속성이 중복되면 문제가 발생하므로 주의!
-
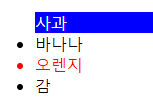
클래스 선택자로 특정한 클래스를 가지고 있는 태그를 선택
-default_class.html (사용 빈도 높다.)
<!DOCTYPE html>
<html>

<head>
    <title>CSS3 Selector Basic</title>
    <style>
        .select {
            color: red;
        }

        .summar {
            background: blue
        }

        .select.summar {  /*둘다 가지는 것을 표현*/
            color: white
        }
    </style>
</head>

<body>
    <ul>
        <li class="select summar">사과</li>
        <li>바나나</li>
        <li class="select">오렌지</li>
        <li>감</li>
    </ul>
</body>

</html>
결과
<!DOCTYPE html>
<html>

<head>
    <title>CSS3 Selector Basic</title>
    <style>
        .select {
            color: red;
        }

        .summar {
            background: blue
        }

        p.select.summar { /*p태그 선택자이면서 select와 summar를 가지고 있는거*/
            color: white
        }

        #ts.select {} /*아이디가 ts이면서 select를 가지고 있는거*/

    </style>
</head>

<body>
    <ul>
        <li class="select summar">사과</li>
        <li>바나나</li>
        <li class="select">오렌지</li>
        <li>감</li>
    </ul>
    <p class="select summar">테스트</p>
</body>

</html>
결과

-
여러 개의 클래스 선택자 사용
- class 속성은 공백으로 구분하여 클래스를 여러 개 사용 가능
-
태그 선택자와 클래스 선택자
- id 속성은 중복되지 않아야 하지만 class 속성은 중복될 수 있음.
- class 속성이 서로 다른 태그에 적용되는 경우 선택자와 클래스 선택자를 함께 사용해서 더 정확하게 태그 선택 가능.
속성 선택자
-
속성 선택자
- 특정 속성과 값을 가지는 태그를 선택할 때 사용
- 속성과 같은 [ ] 괄호를 이용

-
속성 선택자를 사용해 input 태그 선택
- attribute_basic.html
<!DOCTYPE html>
<html>

<head>
    <title>CSS3 Selector Basic Page</title>
    <style>
        input[type="text"] {
            background: red;
        }

        input[type="password"] {
            background: blue;
        }
    </style>
</head>

<body>
    <form>
        <input type="text" />
        <input type="password" />
    </form>
</body>

</html>
결과

후손 선택자와 자손 선택자
-
자손
- div 태그를 기준으로 h1, h2, ul 태그
-
후손
- div 태그 아래 모든 태그
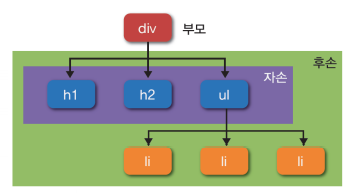
<body>
	<div>
    	<h1>CSS3 선택자 기본</h1>
        <h2>기본 선택자</h2>
        <ul>
        	<li>전체 선택자</li>
            <li>태그 선택자</li>
            <li>아이디 선택자와 클래스 선택자</li>
        </ul>
    </div>
</body>
후손 선택자
-
후손 선택자
- 특정한 태그의 후손을 선택할 때 사용

-
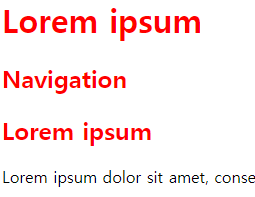
후손 선택자를 사용해 특정한 대상의 후손이라는 것을 구별
- desc_descendants.html
<style>
    #header h1 {
        color: red;
    }

    #section h1 {
        color: orange;
    }
</style>

<body>
    <div id="header">
        <h1 class="title">Lorem ipsum</h1>
        <div id="nav">
            <h1>Navigation</h1>
        </div>
    </div>
    <div id="section">
        <h1 class="title">Lorem ipsum</h1>
        <p>Lorem ipsum dolor sit amet, consectetur adipiscing elit. Sed
            nisi risus, sollicitudin eget vehicula sed, eleifend suscipit neque. </p>
    </div>
</body>
결과

-
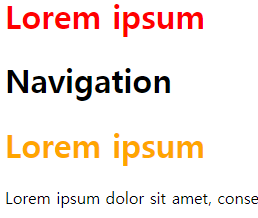
여러 개의 선택자를 함께 사용할 때 주의 사항
- reference_descendants1.html
- header 태그의 후손인 h1 태그를 선택하고 일반적인 h2 태그를 선택
<style>
    #header h1,
    h2 {
        color: red;
    }
</style>

<body>
    <div id="header">
        <h1 class="title">Lorem ipsum</h1>
        <div id="nav">
            <h2>Navigation</h2>
        </div>
    </div>
    <div id="section">
        <h2 class="title">Lorem ipsum</h2>
        <p>Lorem ipsum dolor sit amet, consectetur adipiscing elit. Sed
            nisi risus, sollicitudin eget vehicula sed, eleifend suscipit neque. </p>
    </div>
</body>
결과
-
여러 개의 선택자를 함께 사용할 때 주의 사항
- reference_descendants2.html
- header 태그의 후손인 h1 태그와 header 태그의 후손인 h2 태그 선택
<style>
    #header h1,
    #header h2 {
        color: red;
    }
</style>

<body>
    <div id="header">
        <h1 class="title">Lorem ipsum</h1>
        <div id="nav">
            <h2>Navigation</h1>
        </div>
    </div>
    <div id="section">
        <h2 class="title">Lorem ipsum</h1>
            <p>Lorem ipsum dolor sit amet, consectetur adipiscing elit. Sed
                nisi risus, sollicitudin eget vehicula sed, eleifend suscipit neque. </p>
    </div>
</body>
결과
자손 선택자
-
자손 선택자
- 특정한 태그의 자손을 선택할 때 사용

-
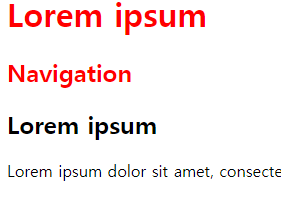
#nav 태그 아래에 있는 h1 태그는 후손이지 자손은 아니기 때문에 스타일이 적용 되지 않음
- desc_children.html
<style>
    #header>h1 {
        color: red;
    }

    #section>h1 {
        color: orange;
    }
</style>

<body>
    <div id="header">
        <h1 class="title">Lorem ipsum</h1>
        <div id="nav">
            <h1>Navigation</h1>
        </div>
    </div>
    <div id="section">
        <h1 class="title">Lorem ipsum</h1>
        <p>Lorem ipsum dolor sit amet, consectetur adipiscing elit. Sed
            nisi risus, sollicitudin eget vehicula sed, eleifend suscipit neque. </p>
    </div>
</body>
결과
-
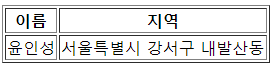
table 태그의 요소를 선택할 때 주의점
- reference_tableWithChildren.html
- 자손 선택자 사용시 번거로움
- 웹 브라우저가 tbody 태그를 자동으로 추가하므로 스타일 속성이 적용되지 않음
<style>
    table tr>th {  /* table tr > th 가 올바름 */
        color: red;  /* tr 보다 th가 구체적이므로 이 색상이 나온다. */
    }

    tr:hover {
        color: white;
        background: black;
    }
</style>

<body>
    <table border="1">  <!-- 생략 했을 뿐 tbody가 있다. -->
        <tr>
            <th>이름</th>
            <th>지역</th>
        </tr>
        <tr>
            <td>윤인성</td>
            <td>서울특별시 강서구 내발산동</td>
        </tr>
    </table>
</body>
결과
반응 선택자
-
반응 선택자
- 사용자의 반응으로 생성되는 특정한 상태를 선택

-
마우스 커서의 움직임에 따라 다른 스타일 적용
- etc_action.html
<!DOCTYPE html>
<html>

<head>
    <title>CSS3 Selector Basic</title>
    <style>
        h1:hover {
            color: red;
        }

        h1:active {
            color: blue;
        }
    </style>
</head>

<body>
    <h1>반응 선택자</h1>
</body>

</html>
마우스 다른 곳 : 검정
마우스 올려놓으면 : 빨강
마우스 클릭 : 파랑
상태 선택자
-
상태 선택자
- 입력 양식의 상태를 선택할 때 사용
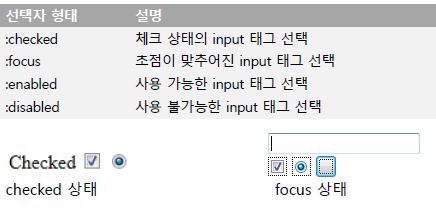
-
상태 선택자
- etc_state.html
<style>
    /* input 태그가 사용 가능할 경우에
    background-color 속성에 white 키워드를 적용합니다. */
    input:enabled {
        background-color: white;
    }

    /* input 태그가 사용 불가능할 경우에
    background-color 속성에 gray 키워드를 적용합니다. */
    input:disabled {
        background-color: gray;
    }

    /* input 태그에 초점이 맞추어진 경우에
    background-color 속성에 orange 키워드를 적용합니다. */
    input:focus {
        background-color: orange;
    }
</style>

<body>
    <h2>사용 가능</h2>
    <input type=“text” />
    <h2>사용 불가능</h2>
    <input type=“text” disabled="disabled" />
</body>
결과

구조 선택자
-
구조 선택자
- 특정한 위치에 있는 태그를 선택할 때 사용

-
첫 번째 태그와 마지막 태그는 둥근 테두리가 적용
홀수와 짝수 번째에 각각 다른 색상의 스타일이 적용
- etc_structure.html
<head>
    <meta charset="UTF-8">
    <meta name="viewport" content="width=device-width">
    <title>Document</title>
    <style>
        ul { overflow: hidden; }
        li {
            list-style: none;
            float: left;
            padding: 15px;
        }

        li:nth-child(2n) {
            background-color: #FF0003;
        }
        li:nth-child(2n+1) {
            background-color: #800000;
        }

        li:first-child {
            border-radius: 10px 0 0 10px;  /*왼쪽 상단부터 시계방향*/
        }
        li:last-child {
            border-radius: 0 10px 10px 0;
        }


    </style>
</head>

<body>
    <ul>
        <li>첫 번째</li>
        <li>두 번째</li>
        <li>세 번째</li>
        <li>네 번째</li>
        <li>다섯 번째</li>
        <li>여섯 번째</li>
        <li>일곱 번째</li>
    </ul>
</body>
결과

색 입력이 힘들다.
- VScode > Extensions(Ctrl + Shift + X) > Color Picker > Install
-
구조 선택자 주의 사항
- reference_structureTrue.html
- 첫 번째의 a 태그에만 붉은색을 적용하려면
<!DOCTYPE html>
<html>

<head>
    <title>CSS3 Selector Basic Page</title>
    <style>
        li:first-child>a {
            color: red;
        }
    </style>
</head>

<body>
    <ul>
        <li><a href="#">주의 사항</a></li>
        <li><a href="#">주의 사항</a></li>
        <li><a href="#">주의 사항</a></li>
        <li><a href="#">주의 사항</a></li>
        <li><a href="#">주의 사항</a></li>
    </ul>
</body>

</html>
결과


댓글